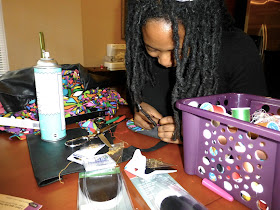
Over the weekend, I held an Upcyclying Party for the Thriftanista Social Club. I invited members over for snacks and a chance to work on those unfinished thrift projects. Do you have those? The pair of jeans you want turn into skinnies. The buttons that need to be changed. The top you want to dye.
My project of choice was to recycle fabric from a vintage muumuu I've had for years. I decided to use some of the fabric to make a bib necklace. A gigantic brightly colored bib necklace. It's been cut down a lot.
If you follow me on social media then you've probably seen this already. I'm so proud of my accomplishment I've been wearing it all the time. It was my first time making jewelry.
It was pretty simple to make. The flower took a bit longer because I needed a whole punching tool. I later discovered from other crafters that what I needed was a Crop-A-Dile. It is now on my Christmas list. I created my holes using a needle and a seam ripper to stretch the hole.
my tools
adhesive spray, fabric, chain, jump rings, clasps, cutters, pliers, and cropadile (or bootleg it like I did with needle and seam ripper)
the steps
- Cut fabric into desired shape. Since this has such a great flower pattern, I only needed to cut around the petals in my desired shape.
- Apply spray adhesive to the back and glue to a piece of leather (from pants I had no plans of wearing again) or other stable fabric.
- Cut leather to match fabric design.
- Cut chain to desired length total length (eyeballed it) and then cut that piece in half.
- I attached loop rings to all 4 ends using the pliers to open and close the rings.
- Add clasp to one end of each chain piece.
- Open the rings at other ends of chain.
- Pierce fabric sides close to top edge (eyeballed, no measuring) with cropadile or bootleg method.
- Take a break because leather is really hard to pierce with bootleg tool.
- Attach chain ends to fabric by inserting jump rings through holes and done!
A bit more complex than wearing my skirt as a top but it was still a pretty easy diy.
 |
| I started out basting the edges but I later deemed it unnecessary. Now I need to remove all of the stitches. One day.... |


GORGEOUS PIECE!
ReplyDeleteI love it!
ReplyDeleteThank you!
Deletelove :))))) great job!
ReplyDeleteThank you!
DeleteI love your "taking a break" photo! HA!!! You are crafty! Great work!
ReplyDeleteHard work I tell you!
DeleteWow, so creative! Did you take pics of what the other ladies worked on?
ReplyDeleteI had one partner in craft. She made a beautiful bowtie necklace and altered a top she bought during one of our Thriftanista meetups. There are more pics in the group photos at http://www.facebook.com/groups/thriftanistasocialclub
DeleteThat is beyond cool! What a statement!
ReplyDeleteThanks Kristin
DeleteI love the necklace, Im going to have to try a version of that!!
ReplyDelete--- http://flowersofyangita.com
Thank you!
Deletevery stylish! love this DIY :)
ReplyDeleteWin ANY item of choice from Zovi.com !!
❤ StylishByNature.com
Thank you!
DeleteI like it. Going to give this a try. Thanks for the tutorial. Would love to see more tutorials on the blog!
ReplyDeleteThanks! I'll see what I can squeeze in as far as tuts go!
Deletelove how creative this is
ReplyDeleteXo Megan
Thanks for checking it out!
Deletewow great job!! looks really good!Maybe we follow each other!? let me know :-) Greetings www.yuliekendra.com
ReplyDeleteThank you! Checking out your page now!
DeleteI love the fact that you made this yourself from scratch - its amazingly creative.
ReplyDeleteGo DIY!
Thank you! Yay diy!!!!!
Deletewhat a AWESOME! DIY!! Your have a wonderful blog! :)
ReplyDeleteXo Pam
http://fashionlovebypam.blogspot.com/
Definitely gorgeous and outside of the box. I'm loving the colors too!
ReplyDeletehttp://thriftyandshameless.blogspot.com